藍牙 BLE CoreBluetooth 初探
藍牙
Bluetooth 4.0之後就將通訊模式分為高速及低速,低速低耗能簡稱為BLE,可以連接一些量測型的感測器類型像:心跳計、血壓…等,使得iDevice可以不用再使用Dock方式製作產品,也不需要再經過MFi認證才能與iDevice連接,如此一來可以增加APP型態的多元,也能間階的降低一些成本,如果想要跟BLE週邊連接,iOS 5之後提供corebluetooth framework與週邊連接,整流程中為Discover、Connect、Explore、Interact,下面文章將會從iDevice連線至BLE周邊讀取資料為例子介紹。
Discover/Connect

依照箭頭方向由上而下為順序依序完成Discover、Connect流程。
CBCentralManager
使用CoreBluetooth Framework中,主要管理連線的是CBCentralManager這個Object,它掌控整個BLE狀態的管理,使用時要先對CBCentralManager初始化:
//-----------start-----------
CBCentralManager *CM = [[CBCentralManager alloc] initWithDelegate:self queue:nil];
//------------end------------
現在就開始往下介紹。
centralManagerDidUpdateState
在一開始宣告初CBCentralManager時就有指定Delegate為self,並且必需要在.h內加上Delegate宣告:
//-----------start-----------
@interface TestCoreBluetooth : NSObject<CBCentralManagerDelegate> {
:
:
:
}
//------------end------------
宣告完成後,再加入centralManagerDidUpdateState這個Delegate內容,
//-----------start-----------
-(void)centralManagerDidUpdateState:(CBCentralManager*)cManager
{
    NSMutableString* nsmstring=[NSMutableString stringWithString:@"UpdateState:"];
    BOOL isWork=FALSE;
    switch (cManager.state) {
        case CBCentralManagerStateUnknown:
            [nsmstring appendString:@"Unknown\n"];
            break;
        case CBCentralManagerStateUnsupported:
            [nsmstring appendString:@"Unsupported\n"];
            break;
        case CBCentralManagerStateUnauthorized:
            [nsmstring appendString:@"Unauthorized\n"];
            break;
        case CBCentralManagerStateResetting:
            [nsmstring appendString:@"Resetting\n"];
            break;
        case CBCentralManagerStatePoweredOff:
            [nsmstring appendString:@"PoweredOff\n"];
            if (connectedPeripheral!=NULL){
                [CM cancelPeripheralConnection:connectedPeripheral];
            }
            break;
        case CBCentralManagerStatePoweredOn:
            [nsmstring appendString:@"PoweredOn\n"];
            isWork=TRUE;
            break;
        default:
            [nsmstring appendString:@"none\n"];
            break;
    }
    NSLog(@"%@",nsmstring);
    [delegate didUpdateState:isWork message:nsmstring getStatus:cManager.state];
}
//------------end------------
centralManagerDidUpdateState的Delegate是用來得知藍牙目前的狀態,所以會有個結果是用來判斷iDevice是否支援BLE,因為BLE是在iphone 4s、New iPad之後才有的,現階段還是需要偵測使用的環境,當然可以根據這些狀態的口報來決定APP的功能或其他提示使用者的動作。
scanForPeripheralsWithServices
先前確定周邊支援BLE且運作正常後,我們就要來開啟BLE搜尋功能來尋找BLE的週邊,當週邊接收到搜尋功能的廣播訊息時,依照BLE通訊規範,週邊會在一定時間內回覆,所以我們在此可以設定2秒的Timer計時器,當時間一到就停止scan的功能。
//-----------start-----------
CBCentralManager *CM = [[CBCentralManager alloc] initWithDelegate:self queue:nil];
[CM scanForPeripheralsWithServices:nil options:options];
[NSTimer scheduledTimerWithTimeInterval:2.0f target:self selector:@selector(scanTimeout:) userInfo:nil repeats:NO];
//------------end------------
設定2秒後觸發執行scanTimeoutmethod,再將scanForPeripheralsWithServices的值設為nil,代表搜尋的Service type不受限制,當你搜尋特定時,就必需要將它的UUID填入,像範例這樣:
//-----------start-----------
 NSArray    *uuidArray= [NSArray arrayWithObjects:[CBUUID UUIDWithString:@"180D"], nil];
        [CM scanForPeripheralsWithServices:uuidArray options:options];
//------------end------------
其中UUIDWithString:@"180D"的180D就是Heart Rate Service type,一旦指定Service type,結果就只會將週邊有Heart Rate類型一一列出來,要了解更多的Service Type可以到Bluetooth官網查詢。
當您了解Service type是哪一種類型時就可以來做對應的流程及資料的解析,也可以製作出符合一般標準週邊的通用APP。
didDiscoverPeripheral
didDiscoverPeripheral屬於Delegate功能,所以要按照它預設的宣告將要處理的過程寫在裡面,格式如下:
//-----------start-----------
-(void)centralManager:(CBCentralManager *)central didDiscoverPeripheral:(CBPeripheral *)peripheral advertisementData:(NSDictionary *)advertisementData RSSI:(NSNumber *)RSSI
{

//處理過程

}
//------------end------------
advertisementData會報告可以連線的週邊內容, 如果將它印出來會像這樣:
//-----------start-----------
adverisement:{
    kCBAdvDataLocalName = "INFOS 4090v35.05";
    kCBAdvDataServiceUUIDs =     (
        "Unknown (<fff0>)"
    );
    kCBAdvDataTxPowerLevel = 0;
}

//------------end------------
RSSI是訊號的強度,是以NSNumber Object存在,取得後可以依照NSNumber的方式整數值做處理與轉換,接下來我們將一些資訊列印出來,整個範例可以是這樣子:
//-----------start-----------

-(void)centralManager:(CBCentralManager *)central didDiscoverPeripheral:(CBPeripheral *)peripheral advertisementData:(NSDictionary *)advertisementData RSSI:(NSNumber *)RSSI
{

    NSMutableString* nsmstring=[NSMutableString stringWithString:@"\n"];
    [nsmstring appendString:@"Peripheral Info:"];
    [nsmstring appendFormat:@"NAME: %@\n",peripheral.name];
    [nsmstring appendFormat:@"RSSI: %@\n",RSSI];

    if (peripheral.isConnected){
        [nsmstring appendString:@"isConnected: connected"];
    }else{
        [nsmstring appendString:@"isConnected: disconnected"];
    }
    NSLog(@"adverisement:%@",advertisementData);
    [nsmstring appendFormat:@"adverisement:%@",advertisementData];
    [nsmstring appendString:@"didDiscoverPeripheral\n"];
    NSLog(@"%@",nsmstring);

}

//------------end------------
結果輸出:
//-----------start-----------
2013-02-25 14:43:17.243 gw-health-01[141:907]
Peripheral Info:NAME: INFOS 4090v35.05
RSSI: -69
isConnected: disconnected
adverisement:{
    kCBAdvDataServiceUUIDs =     (
        "Unknown (<fff0>)"
    );
}
//------------end------------
如果有發現可連線的BLE週邊,它就會不斷的執行didDiscoverPeripheral,並將資訊傳入,利用這個方式將每次得到的結果存入Array,就可以得到搜尋周邊的結果然後再提供給USER選擇,或是從中可以去判斷某個特別的週邊是否存在而決定要不要連線。
stopScan
執行scanForPeripheralsWithServices 掃描周邊設定2秒的Timer,當時間到時就停止scan,一般2秒內無反應就可以當作是沒有其他週邊回應,承上面scanForPeripheralsWithServices中有設定Timer去呼叫scanTimeout,所以將stopScan寫在scanTimeout裡面:
//-----------start-----------
- (void) scanTimeout:(NSTimer*)timer
{
    if (CM!=NULL){
            [CM stopScan];
    }else{
        NSLog(@"CM is Null!");
    }
    NSLog(@"scanTimeout");
}

//------------end------------
connectPeripheral
didDiscoverPeripheral得到的BLE週邊列表讓User選擇要連線的BLE,再將 CBPeripheral傳入connectPeripheral進行連線,格式:
//-----------start-----------
 [CBCentralManager connectPeripheral:CBPeripheral* options:NSDictionary*]
//------------end------------
在此將它包裝成一個connect Method,
//-----------start-----------
- (void) connect:(CBPeripheral*)peripheral
{

    if (![peripheral isConnected]) {
        [CM connectPeripheral:peripheral options:nil];
        connectedPeripheral=peripheral;
    }

}

//------------end------------
option傳入nil,connectPeripheral傳入Method connect的值。
didConnectPeripheral
執行connectPeripheral之後並連線成功後就會引發didConnectPeripheral的Delegate:
//-----------start-----------
-(void)centralManager:(CBCentralManager *)central didConnectPeripheral:(CBPeripheral *)peripheral
{
:
:
:

}
//------------end------------
在這裡有個重點,連線成功後引發Delegate時,就必需要針對其CBPeripheral馬上進行discoverServices的動作,去了解週邊提供什麼樣的Services
執行discoverServices之後又會引發另一個didDiscoverServicesDelegate,不過這會在Explore中介紹。
Explore

Discover/Connect 中使用CBCentralManager進行連線/搜尋BLE周邊的功能,連線之後需要靠的是CBPeripheral來傳送/接收資料。
CBPeripheral
//-----------start-----------
@interface DYCoreBluetooth : NSObject<CBCentralManagerDelegate, CBPeripheralDelegate> {

:
:
:

}

//------------end------------
之後連線的重點全都是在Delegate的互動,查看Service Type或是有什麼樣的Services可以提供。
didConnectPeripheral
前面有稍為介紹didConnectPeripheral,這是在連線成功後就會引發的Delegate,但一定要在這裡執行一些Method才可以順利的引發另一個CBPeripheral的Delegate去查看有什麼樣的Services
//-----------start-----------
-(void)centralManager:(CBCentralManager *)central didConnectPeripheral:(CBPeripheral *)peripheral
{
    NSLog(@"Connect To Peripheral with name: %@\nwith UUID:%@\n",peripheral.name,CFUUIDCreateString(NULL, peripheral.UUID));

    peripheral.delegate=self;
    [peripheral discoverServices:nil];//一定要執行"discoverService"功能去尋找可用的Service

}

//------------end------------
例子中已經將peripheral.delegate=self,接下來進行peripheral的任何動做引發的Delegate都在這個Object中,執行discoverServicesMethod,讓它去尋找Services,一找到Services就又會引發didDiscoverServicesDelegate,這樣我們就可以了解有什麼Services。
didDiscoverServices
從這裡開始就是最關鍵
//-----------start-----------
- (void)peripheral:(CBPeripheral *)peripheral didDiscoverServices:(NSError *)error {
    NSLog(@"didDiscoverServices:\n");
    if( peripheral.UUID == NULL  ) return; // zach ios6 added
    if (!error) {
        NSLog(@"====%@\n",peripheral.name);
        NSLog(@"=========== %d of service for UUID %@ ===========\n",peripheral.services.count,CFUUIDCreateString(NULL,peripheral.UUID));

        for (CBService *p in peripheral.services){
            NSLog(@"Service found with UUID: %@\n", p.UUID);
            [peripheral discoverCharacteristics:nil forService:p];
        }

    }
    else {
        NSLog(@"Service discovery was unsuccessfull !\n");
    }

}

//------------end------------
peripheral.services.count會知道有多少個Services,在每個Servces中還會有Characteristics需要了解,所以會針對每個Service來執行 peripheral discoverCharacteristics: forService:去知道每個Service下有多少個Characteristics提供傳送/接收的溝通,在執行discoverCharacteristics後也引發didDiscoverCharacteristicsForService Delegate,最後再由didDiscoverCharacteristicsForService真正的判斷什麼樣的Service、什麼樣的Characteristic再進行之後收到的資料的處理動作,例如: 發現2A37的Characteristic,就要進行註冊通知,到時候BLE週邊發訊息過來才會立即的得到通知並得到資料。
didDiscoverCharacteristicsForService
整個最關鍵的地方就是這個Delegate,程式架構如下:
//-----------start-----------
-(void)peripheral:(CBPeripheral *)peripheral didDiscoverCharacteristicsForService:(CBService *)service error:(NSError *)error
{

:
:
:

}

//------------end------------
Interact
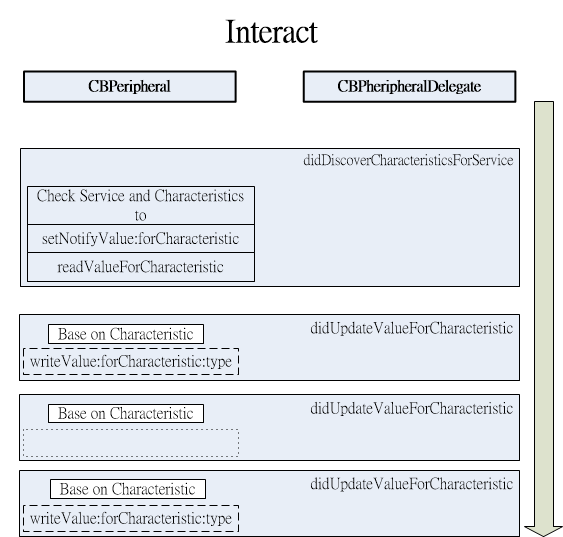
完成didDiscoverCharacteristicsForService之後,整個連線過程算是完成,之後的didUpdateValueForCharacteristicDelegate是整個資料接收動作都在這發生,經過接收到的資料進行即時處理就可以取得BLE週邊的訊息,如果必需要將資料傳至BLE週邊時,再使用writeValue的Method將資料出,以上為BLE連線最基本使用方式就大致上完成。
didDiscoverCharacteristicsForService
由Apple提供的資料擷取某部分來了解架構,等下程式就是利用這架構去尋訪所有的CharacteristicsForService
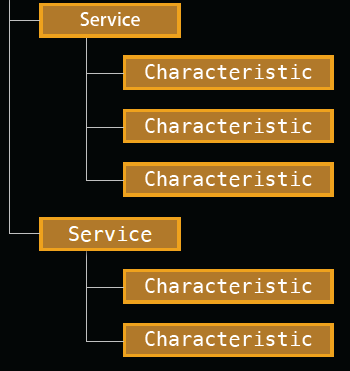
每個Servic下都會有很多的Characteristics,Characteristics是提供資料傳遞的重點,它會有個UUID編號,再由這個編號去Bluetooth 官方查表得到是哪種資料格式,知道格式後就能去將資料解開並加以使用。
真正的例子:
//-----------start-----------
-(void)peripheral:(CBPeripheral *)peripheral didDiscoverCharacteristicsForService:(CBService *)service error:(NSError *)error
{

    CBService *s = [peripheral.services objectAtIndex:(peripheral.services.count - 1)];
    NSLog(@"=========== Service UUID %s ===========\n",[self CBUUIDToString:service.UUID]);
    if (!error) {
        NSLog(@"=========== %d Characteristics of service ",service.characteristics.count);

        for(CBCharacteristic *c in service.characteristics){

            NSLog(@" %s \n",[ self CBUUIDToString:c.UUID]);
          //  CBService *s = [peripheral.services objectAtIndex:(peripheral.services.count - 1)];
            if(service.UUID == NULL || s.UUID == NULL) return; // zach ios6 added


            //Register notification
            if ([service.UUID isEqual:[CBUUID UUIDWithString:@"180D"]])

            {
                if ([c.UUID isEqual:[CBUUID UUIDWithString:@"2A37"]])
                {
                    [self notification:service.UUID characteristicUUID:c.UUID peripheral:peripheral on:YES];
                    NSLog(@"registered notification 2A37");
                }
                if ([c.UUID isEqual:[CBUUID UUIDWithString:@"2A38"]])
                {
                    [self notification:service.UUID characteristicUUID:c.UUID peripheral:peripheral on:YES];
                    NSLog(@"registered notification 2A38");
                }
                if ([c.UUID isEqual:[CBUUID UUIDWithString:@"2A39"]])
                {
                    [self notification:service.UUID characteristicUUID:c.UUID peripheral:peripheral on:YES];
                    NSLog(@"registered notification 2A39");
                }

            }

        }
        NSLog(@"=== Finished set notification ===\n");


    }
    else {
        NSLog(@"Characteristic discorvery unsuccessfull !\n");

    }
    if([self compareCBUUID:service.UUID UUID2:s.UUID]) {//利用此來確定整個流程都結束後才能設定通知
        [delegate didConnected:peripheral error:error];
        NSLog(@"=== Finished discovering characteristics ===\n");
        //全部服務都讀取完畢時才能使用!

    }

}

//------------end------------
上面 例子是以Heart Rate(180D)為主,

Heart Rate的規格來說,0x2A37可以得到心跳的數據,所以針對此項進行註冊通知,一旦有新的數據就會傳入新的數據資料並呼叫didUpdateValueForCharacteristicDelegate,來得到每次的心跳數據更新。
//-----------start-----------
 [(CBPeripheral *)p setNotifyValue:(BOOL) forCharacteristic:CBCharacteristic *)]

//------------end------------
將Characteristic的Point傳入並設定setNotifyValue:on就完成註冊通知,之後如果有更新資料時就會引發didUpdateValueForCharacteristic Delegate,再進行資料處理。
notification
在設定註冊通知過程有點繁雜,所以我自行撰寫一個Method為notification,它可以從Service UUID及Characteristic UUID來找到Service與Characteristic的Object Point:。
//-----------start-----------
-(void) notification:(CBUUID *) serviceUUID characteristicUUID:(CBUUID *)characteristicUUID peripheral:(CBPeripheral *)p on:(BOOL)on {

    CBService *service = [self getServiceFromUUID:serviceUUID p:p];
    if (!service) {
        if (p.UUID == NULL) return; // zach ios6 addedche
        NSLog(@"Could not find service with UUID on peripheral with UUID \n");
        return;
    }
    CBCharacteristic *characteristic = [self getCharacteristicFromUUID:characteristicUUID service:service];
    if (!characteristic) {
        if (p.UUID == NULL) return; // zach ios6 added
        NSLog(@"Could not find characteristic with UUID  on service with UUID  on peripheral with UUID\n");
        return;
    }
    [p setNotifyValue:on forCharacteristic:characteristic];

}


-(CBService *) getServiceFromUUID:(CBUUID *)UUID p:(CBPeripheral *)p {

    for (CBService* s in p.services){
        if ([self compareCBUUID:s.UUID UUID2:UUID]) return s;
    }
    return nil; //Service not found on this peripheral
}

-(CBCharacteristic *) getCharacteristicFromUUID:(CBUUID *)UUID service:(CBService*)service {

    for (CBCharacteristic* c in service.characteristics){
        if ([self compareCBUUID:c.UUID UUID2:UUID]) return c;
    }
    return nil; //Characteristic not found on this service
}
//------------end------------
使用時只需要將Service/Characteristic的UUID及得到週邊的Peripheral物件傳入,並設定是on(YES)或off(NO)就完成。
didUpdateValueForCharacteristic
didUpdateValueForCharacteristic在連線完成後對於數據資得的取得顯的非常重要,範例中有比對2個UUID為2A37與2A38
//-----------start-----------
-(void)peripheral:(CBPeripheral *)peripheral didUpdateValueForCharacteristic:(CBCharacteristic *)characteristic error:(NSError *)error
{

    if ([characteristic.UUID isEqual:[CBUUID UUIDWithString:@"2A37"]])
    {
        if( (characteristic.value)  || !error )
        {

        }
    }

    if ([characteristic.UUID isEqual:[CBUUID UUIDWithString:@"2A38"]])
    {
        //set refresh int
        uint8_t val = 1;
        NSData* valData = [NSData dataWithBytes:(void*)&val length:sizeof(val)];
        [peripheral writeValue:valData forCharacteristic:characteristic type:CBCharacteristicWriteWithResponse];
    }

}

//------------end------------
針對這兩個UUID成立時在這個Delegate做對應處理的工作,範例中以2A38來解說一下:
當更新資料為2A38時,程式將直接寫入 1 ,為什麼寫入1呢?在下表中可以了解,1所代表的就是Chest

意思是告訴心跳感測器量測的位置是在胸部的部分。
注意
整個didUpdateValueForCharacteristic在處理時請注意資料格式的解釋,往往是因為格式解釋錯誤才會得到不正確的資料。
延伸閱讀
目前已經完成CoreBluetooth For Centeral系列文章,下面為文章的標題:
CoreBluetooth for Central (1) ~ (7)
這是講述CoreBluetooth For Central使用方式,整篇文章最後會完成Heart Rate Measurement連接Polar H7的例子結束Central的學習。
6.Explore Services from Device
更新資訊
| 日期 | 內容 |
|---|---|
| 2015/01/27 | 增加延伸閱讀 |