Arduino遙控大金(daikin)冷氣 (3) – 網路
看這些時必需要先閱讀過
之後才會對於Arduino_IRremote_Daikin for arduino的library很熟悉,接下來才能真正的實用它。
經過Danny不斷嘗試後完成幾個版的測試,最後決定先用最簡易的方式完成網路控制的初步功能,所以需要配合官方出品的EthernetShield。
準備工作
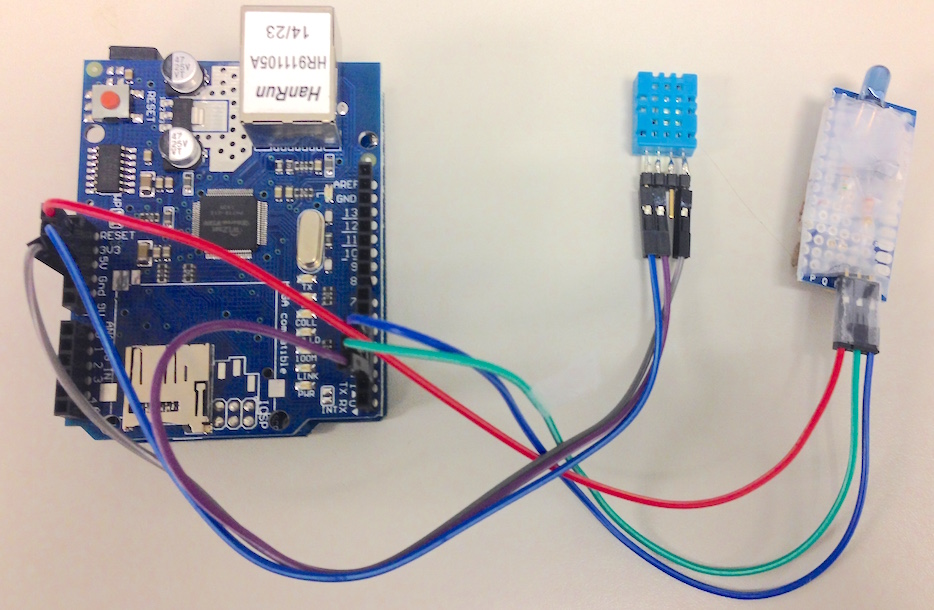
硬體:
- Arduino x1
- EthernetShield x1
- DHT 11 x1
- IR 電路 x 1
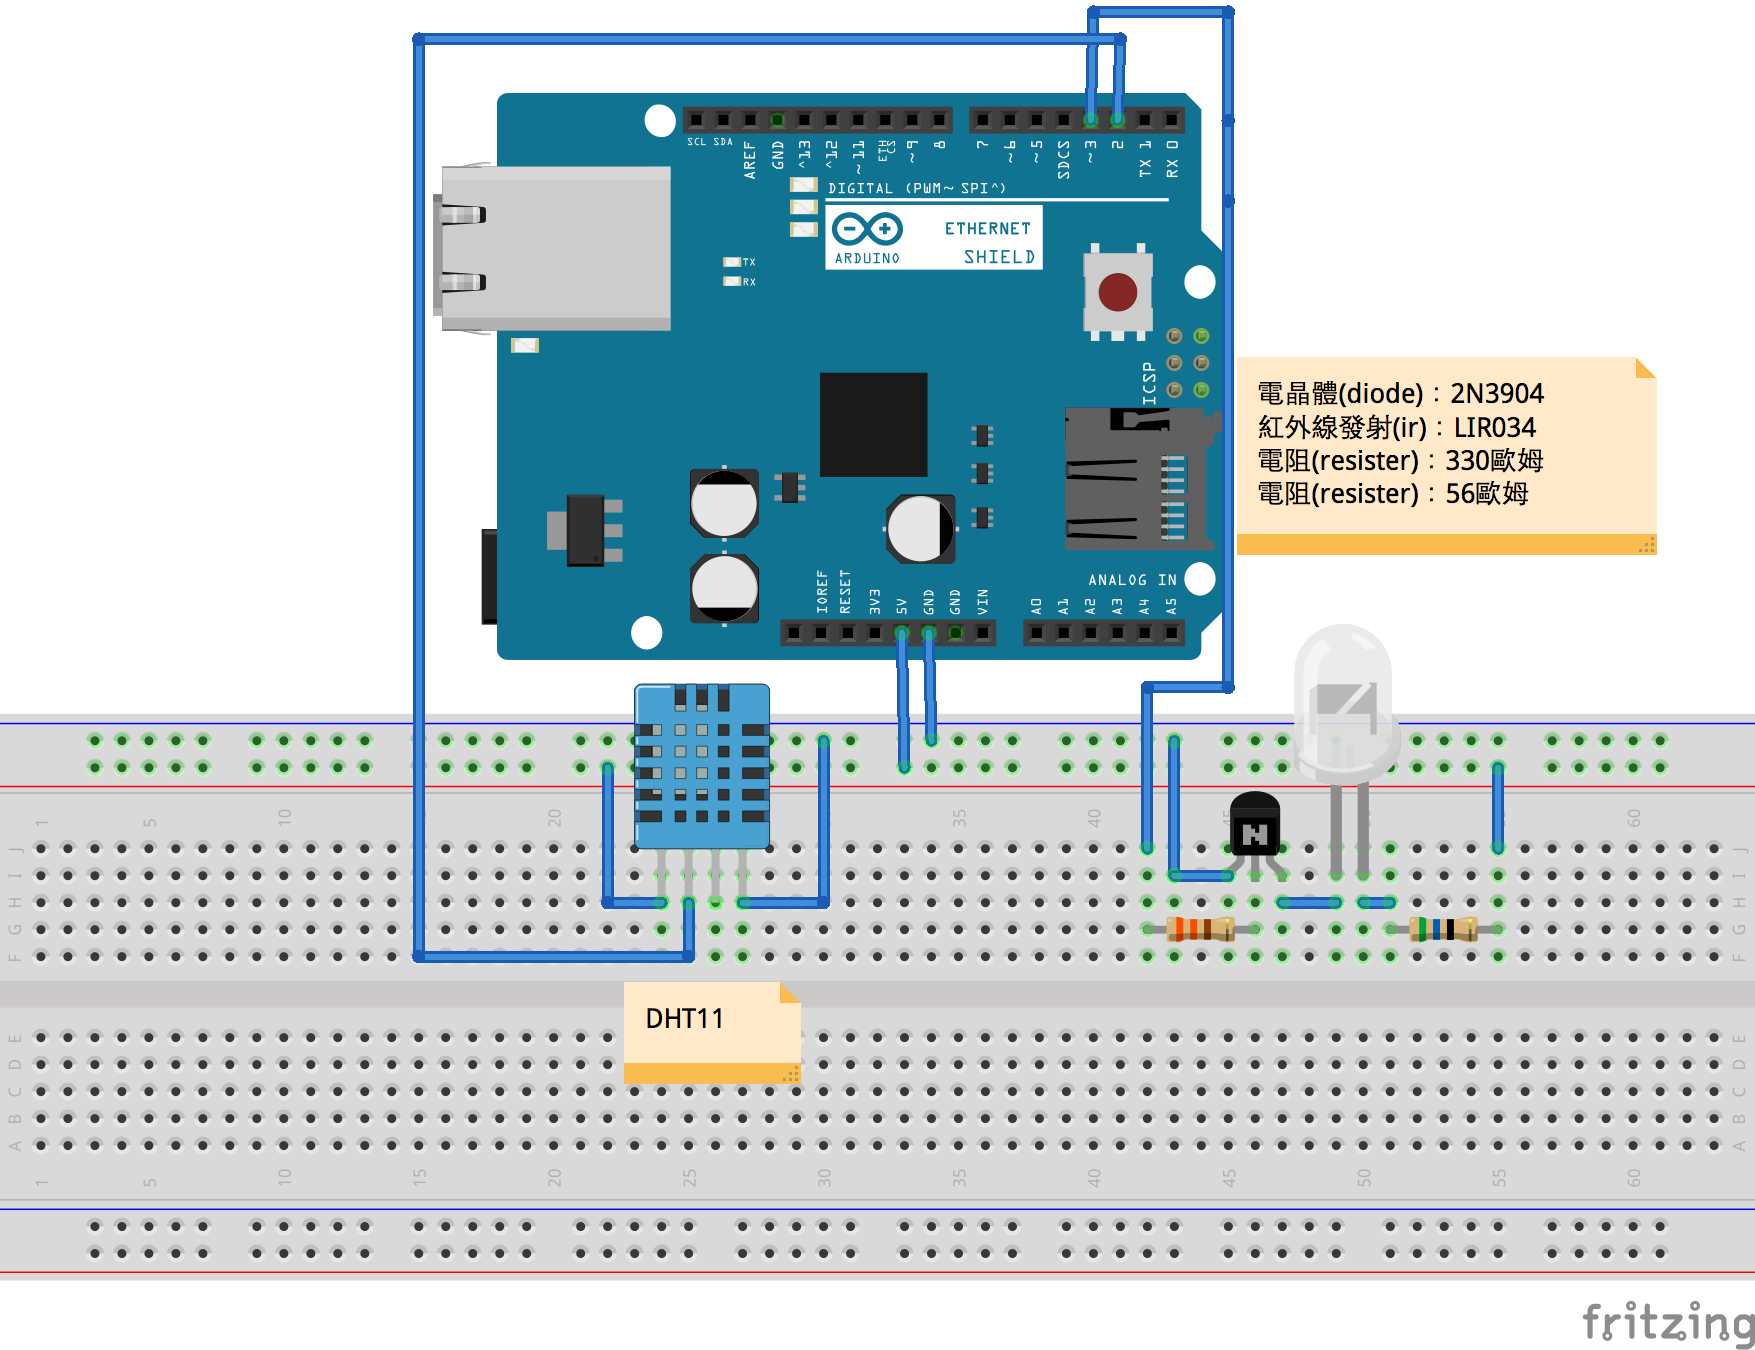
電路:
程式:
Library
請先確實安裝上述的Library後再進行範例程式的下載、使用。
範例程式
此範例程式已經包含基本說明,下載後請詳細閱讀。
開始
首先文中說明會使用DaikinEthernet程式說明中的部分內容來解釋怎麼使用並驗證功能。
網路設定
範例程式準備好時,必需要先將網路環境設定成您的環境方能使用,目前因程式還未提供完整的設定的介面,所以需要一開始在程式中就設定正確,以下為以網路環境 192.168.9.xxx網段來說明,該Arduino所使用的IP:192.168.9.59。
上述狀況清楚後,開啟範例程式DaikinEthernet.ino並且找到網路IP設定的地方:
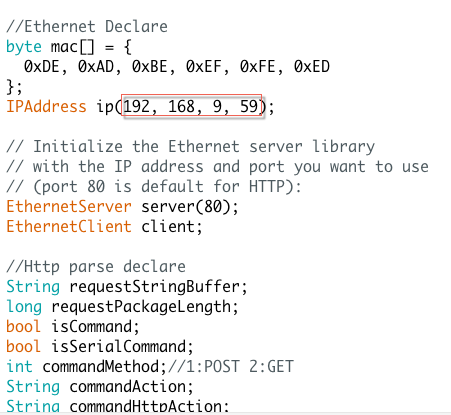
將IP改成你網段的設定就完成整個範例程式的設定,如果你需要與連外網路連接,那就需要再設定Netmask、Gateway。
網路連外
找到IP設定的程式內容:
IPAddress ip(192, 168, 9, 59);

// Initialize the Ethernet server library
// with the IP address and port you want to use
// (port 80 is default for HTTP):
EthernetServer server(80);
新增其他設定的程式:
IPAddress gateway(192, 168, 9, 1);
IPAddress networkmask(255, 255, 255, 0);
所以程式新增為:
IPAddress ip(192, 168, 9, 59);
IPAddress gateway(192, 168, 9, 1);
IPAddress networkmask(255, 255, 255, 0);
// Initialize the Ethernet server library
// with the IP address and port you want to use
// (port 80 is default for HTTP):
EthernetServer server(80);
再來將設定存入:
尋找設定網路的程式段:
  //ethernet shield init
  Ethernet.begin(mac, ip);
  Serial.println(Ethernet.localIP());
  server.begin();
修改為:
  //ethernet shield init
  Ethernet.begin(mac, ip, gateway, networkmask);
  Serial.println(Ethernet.localIP());
  server.begin();
網路設定一切都完成後,接下來就是將範例程式編譯、上傳至Arduino的動作。
上傳程式碼
如何上傳程式碼這部分就不加以描述,用部分擷圖來提供過程:
Daikin Ethernet Command/Format 命令與格式
此段功能是直接將DaikinEthernet說明擷取下來的,使用時詳看一下。
format 格式
http://your ip/action[get|set][number][value] http://你的位址/動作[取|存][號碼][值]
action 動作
action is device like sensor,daikin ac…etc.
get/set 取//存
get is ?,set is =
取值為問號?,存值為=
number 號碼
number can support same type of devices,but it is reserve and value is 00.
號碼為了將來能支援同類型的裝置而準備,目前功能未完成,預設值以00
value 值
value is two digital ascii number a group.ex: 1 is 01.
值為兩位數的字串型數值,像數值1則以01表示
example 範例
http://192.168.9.59/ft?00
check your arduino feature and response like:
檢查你的arduino支援功能的請求,得到的結果如下:
{"status":"ok","version":"1","ac":"1,"humidity":"1","temperature":"1"}
command 命令
number is reserve and value is 00
getter 取值命令
ft?00
get feature 取得支援功能
{"status":"ok","version":"1","ac":"1,"humidity":"1","temperature":"1"}
hm?00
get humidity 取得溼度
{"status":"ok","number":"0","humidity":"32.00"}
tp?00
get temperature 取得溫度
{"status":"ok","number":"0","temperature":"25.00"}
ac?00
get air condition state 取得空調的狀態
{"status":"ok","number":"0","power":"0","swing":"0","mode":"0","speed":"0","temperature":"25"}
setter 存值命令
ac=[00][power][swing][mode][speed][temperature]
set air condition state 設定空調的狀態
power 電源
0: off 1: on
swing 擺動
0:off 1:on
mode 模式
0:FAN 1:COOL 2:DRY
speed 速度
0:speed 1 1:speed 2 2:speed 3 3:speed 4 4:speed 5 5:Auto 6:moon
temperature 溫度
18 ~ 33 degree.
功能測試
DaikinEthernet範例程式未提供Web介面控制功能,功能測試使用cURL測試完整性,未來會提供iOS/Android的用戶端測試!
範例
1.查看目前溫度
curl http://192.168.9.59/tp?00
結果:
{"status":"ok","number":"0","temperature":"23.00"}
2.查看目前溼度
curl http://192.168.9.59/hm?00
結果:
{"status":"ok","number":"0","humidity":"33.00"}
3.控制大金冷氣
電源:開啟 擺能:關 模式:冷氣 速度:自動 溫度:25度
curl http://192.168.9.59/ac=000100010525
結果:
{"status":"ok"}
如果命令不完成或錯誤會產生如下的結果:
{"status":"command error"}
4.查看大金冷氣狀態
curl http://192.168.9.59/ac?00
結果:
{"status":"ok","number":"0","power":"1","swing":"0","mode":"1","speed":"5","temperature":"25"}
結論
此次在Arduino_IRremote_Daikin功能上增加網路的功能,提供用網路控制大金冷氣及溫、溼度資訊查詢的介面,一旦介面提供了,那客戶端的程式只要支援介面的命令,也能提供更簡便的操作。例如:使用Raspberry Pi加上Web Server就能提供Web上的設定功能,或是將功能寫在iOS/Android之上,那就更能提供透過網路更加強彈性的控制大金冷氣…等眾多功能延伸。